| Setting |
Default Setting |
Description |
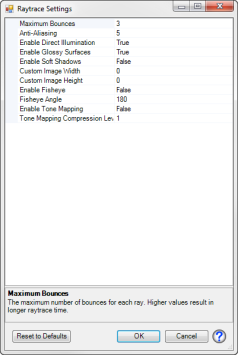
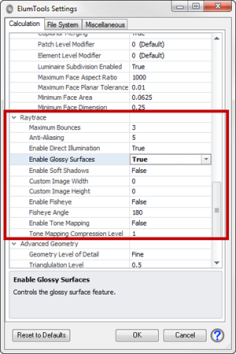
| Maximum Bounces |
3 |
The maximum number of specular bounces for each ray. The default value is adequate for most environments. Environments with many specular or transmissive surfaces may require an increase in the number of bounces to ensure consideration of all specular bounces.
Increasing the number of bounces will increase raytrace time.
|
| Anti-Aliasing |
5 |
The Anti-Aliasing level applied to the Ray Trace images. Anti-Aliasing minimizes the appearance of jagged edges in the Ray Trace images. Anti-Aliasing is achieved in the Ray Trace process by tracing additional rays to the corners of each pixel. This process will increase raytrace time; however, the image quality may be greatly improved.
With Anti-Aliasing level equal to zero, the Ray Trace process starts by tracing four rays to the corners of each pixel. With Anti-Aliasing applied, (N + 1)2 additional rays are required (where N equals the Anti-Aliasing level). These additional initial rays may in turn spawn additional rays.
The largest time differential occurs between 0 and 1. Subsequent increases are very fast. BEST PRACTICE: For fast check renderings, sett Anti-Aliasing to zero. Then set to 5 for final images.
|
| Enable Direct Illumination |
True |
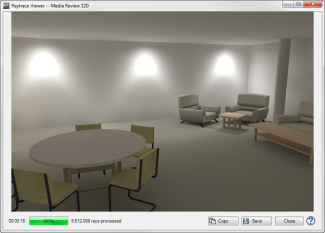
When enabled, the Direct Illumination from all specified light sources (Daylighting and Electric Lighting) is ray traced in place of the standard radiosity process. The result is a more accurately rendered luminance gradient on all surfaces (especially wall scalloping). This setting is enabled by default, and is always enabled for daylighting when there is a direct-sun contribution. The Raytrace calculation time will increase in proportion to the number of light sources.
If you experience scalloping on walls adjacent to linear sources, you may need to enable Force Luminaire Subdivision in Settings.
|
| Enable Glossy Surfaces |
True |
Surfaces may be made to look shiny or glossy by adding a Glossiness value to their material properties (Advanced Material Properties). Glossiness refers to the shininess and apparent smoothness of a surface. A highly gloss surface appears very smooth and shiny (e.g. polished marble), while a low gloss surface appears somewhat rough and dull (e.g. a hardwood floor with a low satin finish).
The range of Glossiness is 0.0001 (essentially diffuse) to 1.00 (perfectly specular). The default value is 0 - No glossiness applied. A value of 0.10 is recommended to provide a realistic appearing low gloss finish to surfaces for most applications.
Glossiness can be applied to any surface including glass (which produces a ‘frosted’ effect).
With the glossy surfaces feature enabled, ElumTools bounces 9 rays from each pixel intersection within a specular surface instead of one. The rays are 'jittered' (scattered) from the specular reflection direction based on the glossiness value. With a value of 1.0 (perfectly specular), the rays are not jittered and the reflected image is perfectly reflected (all rays are reflected in the same direction, no distortion). As the value approaches 0 (essentially diffuse), the amount of jittering increases, yielding a dull (or distorted) reflected image (the rays are not reflected in the same direction). As a result, you will not notice glossy surface reflections from strongly curved surfaces. The effect of the glossy reflections becomes more apparent as the distance between the glossy surface and the reflected object increases.
|
| Enable Soft Shadows |
False |
This technique traces the soft shadows created by the boundaries of the luminous areas. It can soften harsh shadow lines from objects on surfaces and increase the realism your final images. Raytracing times will increase 10 - 15 times with Soft Shadows enabled so best practice dictates that you reserve this for final imagery.
|
| Custom Image Width |
0 |
You can set a custom image size when raytracing. The default setting of zero uses the size of the calculation viewer image on your screen (in pixels). You can set your own image width in Pixels. Smaller images require fewer rays and complete more quickly.
BEST PRACTICE: If you intend on using an image in a magazine or printed publication, raytrace a larger image but be prepared to wait. Image widths of greater than 3000 pixels are not uncommon and may take hours.
|
| Custom Image Height |
0 |
Image height in pixels (see Custom Image Width)
|
| Enable Fisheye |
False |
ElumTools can generate a Fisheye, or ultra-wide angle view. Fisheye images are visually distorted to create a wide panoramic or hemispherical image.
|
| Fisheye Angle |
180 |
The acceptable range is 45 to 360 degrees, with 180 degrees being the default.
|
| Enable Tone Mapping |
False |
Tone Mapping compression can be applied to ray traced images so that they may be displayed more naturally on a computer monitor, which has a low dynamic display range (typically 255:1). Tone Mapping is typically used to convert the high tones of an image into lower tones (i.e., "dodge the highlights"), or convert the low tones to higher ones (i.e., "burn the shadows").
Enable Tone Mapping here and set the value in the Compression Level setting.
|
| Tone Mapping Compression Level |
1 |
0-1 Converts low tones to higher tones (increase contrast or burn)
1-10 Converts higher tones to lower tones (compress the highlights or dodge)
|